
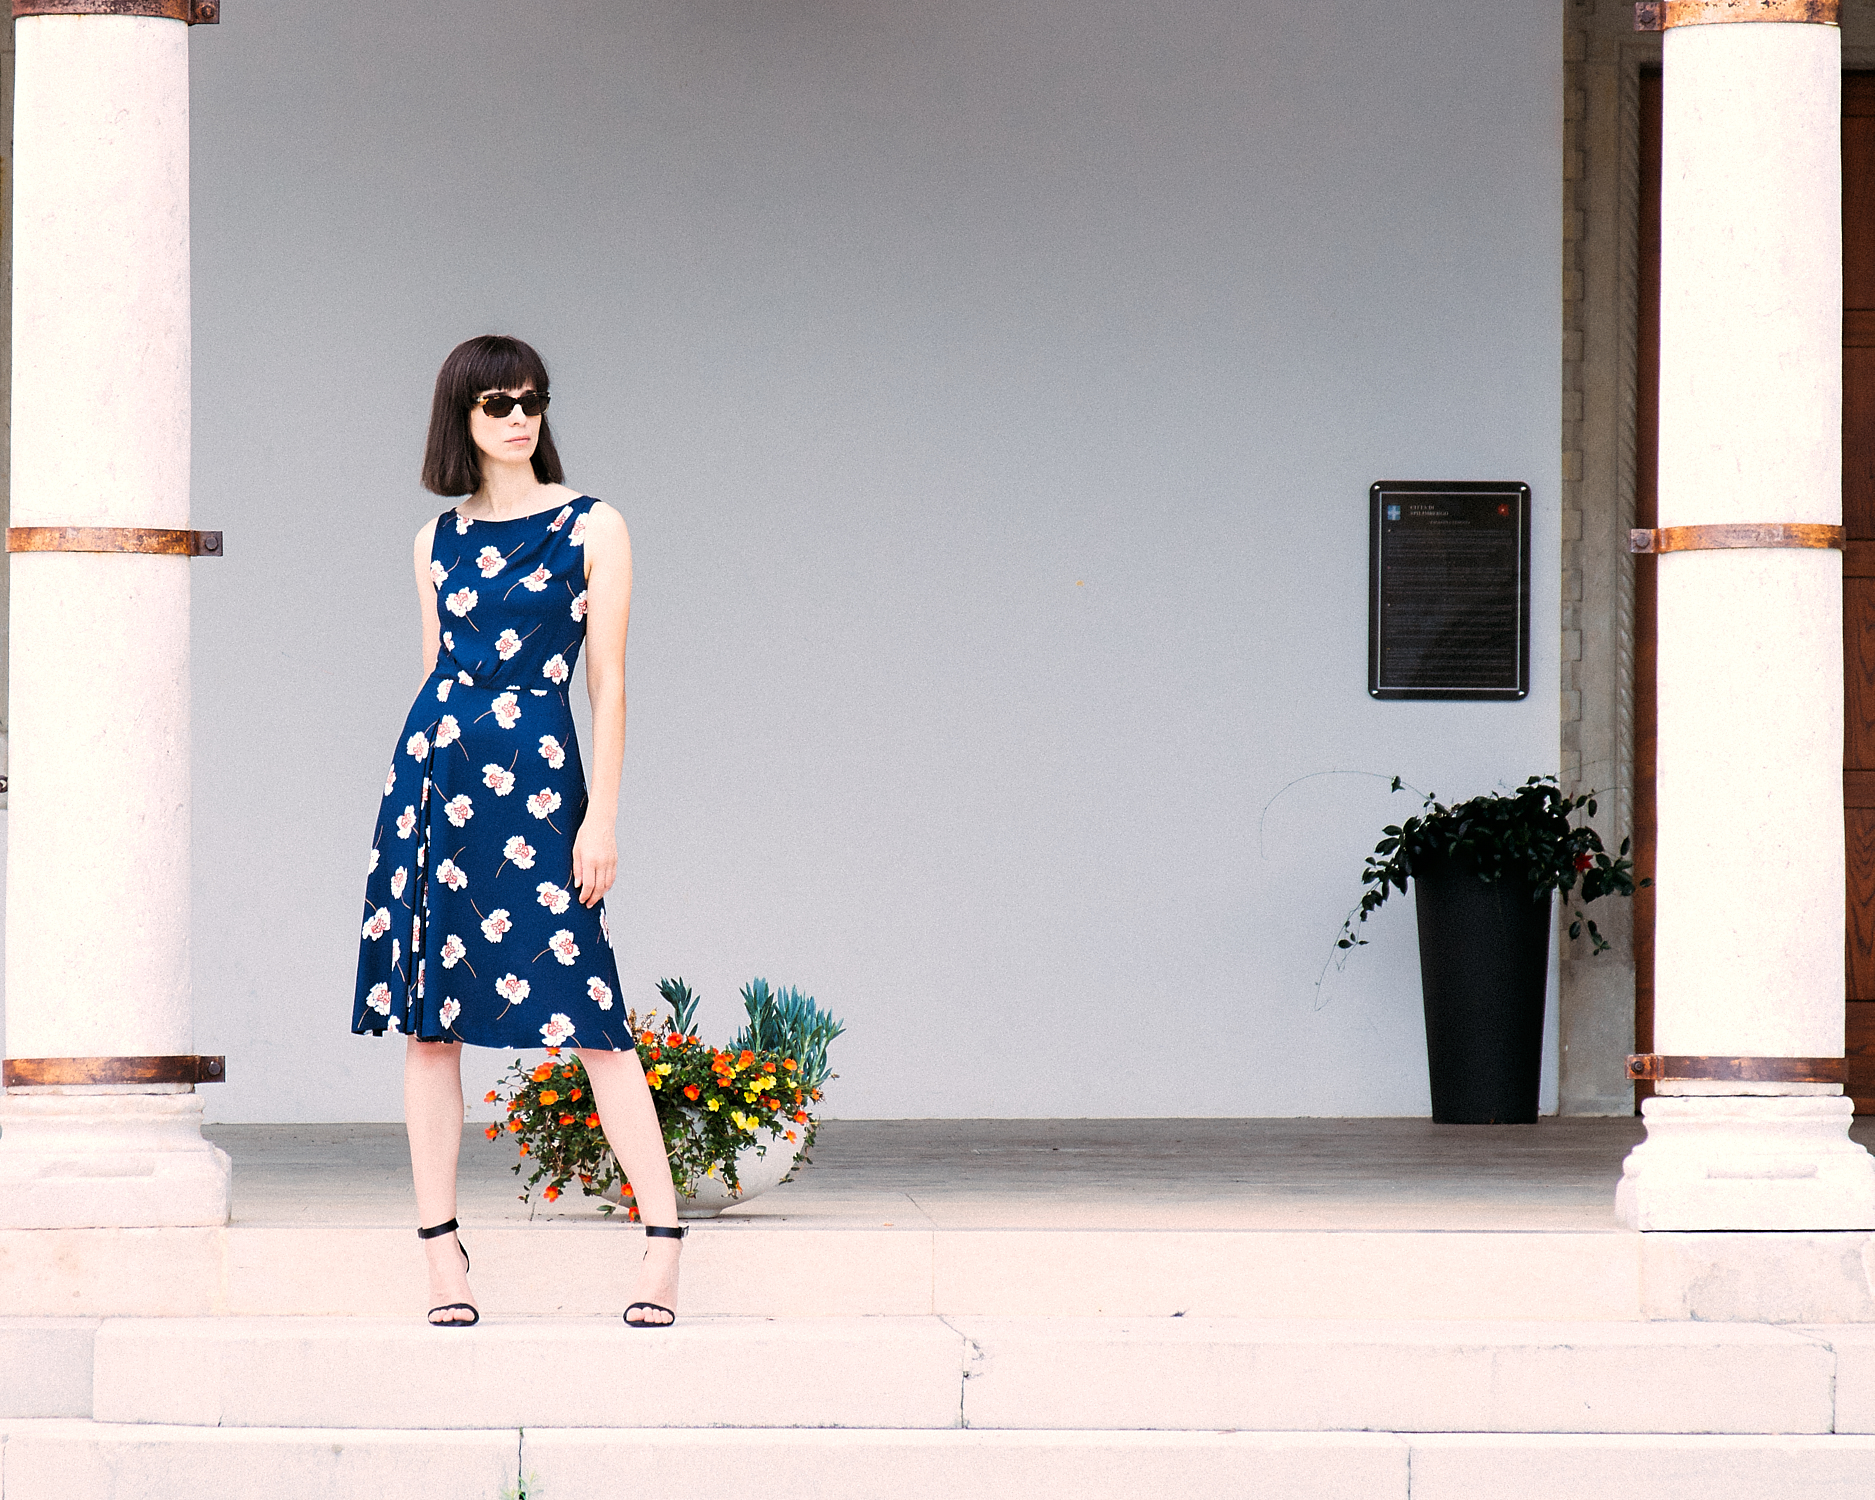
::::There aren’t many cocktail dresses in my wardrobe. I got to a point in my life where I can’t really do without a curated selection of ‘occasionwear’: dresses to be worn once a year (because you can totally wear last year’s occasion dress – a party dress needn’t be a new dress). And although ‘event dressing’ has finally caught up with what we actually like to wear day-to-day, there are those far-flung weddings, countryside birthdays, baby christenings and the like, when you really need to ‘rise to the occasion’, show that you’ve polished up and made an effort. This is the spot in my wardrobe this dress is supposed to fit in. Yet I don’t know how to tackle writing this post. Mainly, because making this dress was what I would describe as ‘a series of hmmmmm moments’.
I should start at the beginning, with me noticing this was a petite’s dress only after assembling the pattern! No matter, lengthening the pattern wouldn’t be an issue, not when I was already in love with the mental image I made about me wearing this dress and how pretty it would look in this fabric. By the way, I already knew I had too little fabric 1.5m against the recommended 2.1m so I would need to play cutting Tetris.
I chose a size based on the cross back measurement. I think it’s the measurement that most accurately describes the ‘frame’ or the general ‘build’ of the body. I measured then the bust circumference and it was all right. Using the center front line (marked on the pattern by notches) as a mirroring line, I measured the cross front on the half of the front bodice without pleats and doubled that. I measured both cross front and back, at about 13-15cm (5-5.5ins) from HPS (high point shoulder). I found the cross front to be a little too wide. Next, I compared the front to the back by laying the back on the front and matching the shoulder seam. This is when I decided to muslin the bodice. The reason is that I measured the back neck width, SNP (side neck point) to SNP, to be 3cm longer than the front neck width! I personally found that puzzling. ::
Nel mio guardaroba non ci sono molti abiti da cocktail. Quegli abiti che metti una volta all’anno per le “occasioni speciali”. Per il matrimonio di ... il battesimo di ... l’anniversario di... Quelle occasioni speciali quando devi far vedere di aver fatto uno sforzo “speciale”. Ecco lo spazio nel mio guardaroba dove andrò a riporre questo vestito. Dovrebbe essere semplice scrivere un articolo su un abitino carino. Purtroppo non è così perché la realizzazione di questo vestito è stata punteggiata da una serie di momenti ‘hmmmmm’.
Cominciamo dall’inizio. Mi sono accorta di aver scelto un cartamodello in taglia petite solo dopo averlo assemblato. Nessun problema, ho pensato. Allungare il corpetto non sarà difficile. Poi mi ero già fatta un’immagine mentale di quanto bene mi sarebbe stato addosso e quanto bello sarebbe con questo particolare tessuto. E mi ci ero anche un po’ innamorata di quest’immagine, quindi sono andata avanti. A proposito, sapevo già di avere un po’ troppo poco tessuto, 1,5 m invece di 2,10 m e quindi di dover giocare a Tetris per tagliarlo, dunque una volta tagliato niente ripensamenti. Sbagliare sarebbe significato buttare il tessuto o comunque recuperare solo una piccola parte.
Ho deciso di misurare tutto molto molto bene. Ho scelto una taglia in base alla larghezza spalle dietro. Penso che questa misura sia quella che rappresenta al meglio la corporatura. Poi ho misurato la circonferenza seno e andava bene. Usando la linea centro avanti (segnata sul carta modello con tacche) come linea speculare, ho misurato la larghezza torace sulla metà senza pieghe del corpetto davanti poi ho raddoppiato questa misura per ottenere la larghezza totale del torace davanti. Entrambe queste misure le ho prese a circa 13-15 cm dal punto prossimale spalla (HPS). Se la larghezza spalle dietro andava bene, la larghezza torace era troppo grande. In seguito ho sovrapposto il dietro sul davanti, facendo combaciare la spalla.... e ho deciso di cucire una teletta di prova perché ho trovato la larghezza dello scollo dietro superiore di 3 cm alla larghezza dello scollo davanti. ::::
::::This is the same front neck width, back neck width difference according to various authors:
Cooklin: 0.6cm, Aldrich: 1cm, Shoben & Ward: 1.8cm, Stringer: 0cm, Donano: 1.4cm, Chunman Lo: 1.2cm, Petrache: 2cm, Whife (vintage): -1/2in, Gilewska: 0cm, Burgo: 0cm, Beazley & Bond: 2cm, Mors De Castro: 0cm, Bunka: 0.4cm
… and these are some of the authors that use drafting methods in which this difference is readily apparent. For others, like Armstrong, Pepin, etc the draft needs to be completed and the difference measured, but I guesstimate it’s between 1/4in and 1/2in.
I know mine to be between 1.8 and 2cm because I have a forward shoulder.
No wonder the muslin showed gapping both front and back neckline. ::
Questo mi è sembrato strano perché ecco quale dovrebbe essere la differenza di larghezza tra scollo dietro e quello davanti secondo alcuni autori di libri di modellistica:
Cooklin: 0.6cm, Aldrich: 1cm, Shoben & Ward: 1.8cm, Stringer: 0cm, Donano: 1.4cm, Chunman Lo: 1.2cm, Petrache: 2cm, Whife (vintage): -1/2in, Gilewska: 0cm, Burgo: 0cm, Beazley & Bond: 2cm, Mors De Castro: 0cm, Bunka: 0.4cm
So che per il mio corpo questa differenza dovrebbe essere di circa 1,8-2 cm perché ho le spalle in avanti.
Non mi sono meravigliata quindi quando ho visto che la teletta di prova faceva difetto sia sullo scollo davanti sia dietro. ::::
::::On the front, I did a standard 1cm forward shoulder adjustment. It’s an adjustment I have to make on pretty much all the garments I sew. By forward shoulder adjustment, I do not mean the ‘cosmetic’ adjustment that has you just move the shoulder point towards the front on the armhole. In my opinion that doesn’t change the mechanics, only the aesthetics.
(‘Forward shoulder adjustment IMO’ parenthesis)
The forward shoulder is that particular posture in which the shoulder points thrust forward. Here are some 3D simulations to illustrate what I mean.
‘Normal’ posture (don’t look too closely at the rest of the bodice, it’s a 5 min drape on the avatar job) ::
Sul davanti ho realizzato una correzione “spalle in avanti” di 1 cm. È una correzione che abitualmente devo fare su quasi tutti i capi che cucio. Quando dico correzione spalle in avanti non mi riferisco alla correzione puramente estetica che sposta il punto distale spalla in avanti sull’incavo manica.
(Parentesi correzione spalle in avanti)
Postura normale::::
::::‘Forward shoulder’ (same bodice)::
Postura con le spalle in avanti::::
::::Note how there’s gaping at the front neckline, the shoulder pushes against the front armhole and there’s separation between the shoulder and the back armhole. The fabric also collapses in the hollow which forms between the shoulder and the chest.
This is the correction: ::
Notate il difetto sullo scollo davanti, il modo in cui la spalla “sbatte” contro l’incavo manica davanti e lo spazio che si forma tra l’incavo dietro ed essa?
La correzione consiste nel spostare in parallelo la spalla (e con la spalla l’incavo manica) verso il centro, riducendo così la larghezza scollo davanti e la larghezza torace. Sul dietro, la correzione dipende molto da quanto sporgono le scapole. Per questa simulazione per non complicare troppo le cose ho presunto che le scapole non sono molto sporgenti.
::::
::::Basically, the front shoulder line moves in parallel towards the center front carrying it with it the armhole curve. To entirely eliminate the collapse I spoke of, it would have to be pushed past the shoulder joint, about at the edge of that hollow, which in case of a sleeved style would be awkward, to say the least. Besides the sleeve itself would give it some support. The correction on the back depends also on how much the shoulder blades protrude. Here, to simplify I presumed they do not protrude very much.
(parenthesis closed)
I don’t know what to call the adjustment on the back… but it doesn’t matter does it. The point is that now the front/back SNP-SNP difference is exactly 2cm.
Here is the sum of all the adjustments I made. ::
(fine parentesi)
Non so come chiamare la correzione delle spalle/scollo dietro ... ma non conta. Importante è che funziona e che adesso la differenza tra scollo dietro e quello davanti è di esattamente 2cm.
Questo è il riepilogo di tutte le correzioni che ho realizzato.::::
::::I lengthened the front and back bodice, the back a little more because I have a backward inclined body (that is when standing straight with the arms hanging normally, from the side you can’t see the back waist because it’s hidden by the arms) It reduces the projection of the breasts resulting in lack of balance between the front bodice and the back bodice. The back appears to be short and separates from the body (that’s why I also increased the back waist dart intake) and the front clings to the body and looks like it’s too long. I think I’ll have to make a 3D simulation of that adjustment too because I know it’s rather hard to picture. I modified the shoulder slope. I did not raise the armhole! I took the bodice a little bit in at the bust and let out a little bit at the waist. I redrafted all the facings.
I got to sewing. When I finished the bodice I didn’t like the way it draped with the three waist pleats…. bust and bellow was all a big bobble. I took the centermost one moved it a few centimeters to the side and angled it towards the apex like it were a dart.
::Ho allungato il davanti e il dietro quest’ultimo un po’ di più perché ho una postura “all’indietro” il che significa che quando sto dritta con le braccia rilassate lungo il corpo dal lato non si riesce a vedere la vita dietro perché è completamente nascosta dalle braccia. L’asse della mia gabbia toracica è inclinato leggermente all’indietro. Dunque, la sporgenza del seno risulta inferiore e il corpetto appare sbilanciato: più lungo dietro che davanti, e mentre sul davanti sbatte contro il corpo sul dietro si distacca in corrispondenza della vita. Per questo ho anche ampliato le riprese in vita dietro. Mi sa che dovrò fare una simulazione 3D anche per questa particolare situazione posturale perché mi rendo conto che è piuttosto difficile da visualizzare. Ho modificato l’inclinazione alla spalla. Non ho rialzato il giromanica! Ho ridotto un po’ il giro petto e ho aumentato il girovita. Ho ridisegnato tutte le paramonture. Il vestito non è foderato.
Ho finito di cucire il corpetto e il drappeggio delle tre pieghe in vita non mi piaceva molto. Creava una sorta di bolla sulla pancia. Ho disfatto la piega più centrale e l’ho spostata verso sinistra ruotandola per puntare verso l’apice del seno come se fosse una pince. ::::

::::I did not muslin the skirt. I just lengthened it an made sure the waistline matched with the bodice. That was a mistake! I should have paid more attention. The technical drawing showed a flared skirt with a pleat. It’s a double inverted box pleat. I thought the hem flowed straight in a continuous line … and it should… except in the middle of the pleat, there’s a seam cut on the bias. There’s also a slit which as it turns out and as a helpful fellow sewist pointed, (isn’t social media great?!... at showing you how stupid you are) belongs to the pattern #103-06/2013, a gown version which is not linked from the flower dress. I simply didn’t bother to copy the text when a while ago I traced the pattern. Anyway, unless you consider the gown with the slit, that seam makes no sense and serves no purpose in my opinion. If I paid attention I would have cut the front skirt as a single piece. That would have spared me so much grief and the result would have been so much cleaner I think. The moment I cut that seam it stretched out, with different ratios because it’s on different bias angles. The first thing I did before anything else was to try to sew the seam but I got so much puckering on the side that stretched out more, and the seam dropped with a corner creating a handkerchief effect. Not even the master dressmakers at Burda managed to avoid that and it’s actually visible in the second pattern picture, the picture I didn’t pay any attention to and skipped to the line drawing! I am not saying it was ugly or I didn’t like it … it just didn’t match that mental picture I made and was very fond of. I smoothed it out as much as I could and kept the slit because it made everything easier. ::
Non ho fatto una prova della gonna. L’ho solo allungata e mi sono accertata che il girovita combaciasse. E stato uno sbaglio, avrei dovuto essere più attenta. Il disegno tecnico del modello raffigura una gonna ampia con una piega doppia. Dal disegno sembra che l’orlo scorri dritto in una linea continua, e dovrebbe essere così. Il problema è che questo cartamodello è stato disegnato per due versioni diverse del modello. La seconda e il modello #103-06/2013 che è un vestito lungo con spacco nella piega. Per entrambi i modelli hanno diviso la gonna in due pezzi. Ma se non fai lo spacco la cucitura non ha nessunissimo senso. Anzi, da fastidio perché è tagliata in sbieco e quindi perde la sua forma originale allungandosi e creando un effetto fazzoletto. Nemmeno le super sarte di Burda sono riuscite a evitarlo! Lo si può notare nella seconda immagine del modello, che io per essere sincera non ho neanche guardato passando direttamente al disegno tecnico il quale dovrebbe dirti tutto quello che devi sapere! Non dico che era brutto, nemmeno che non mi piaceva. Semplicemente non corrispondeva a quell’immagine mentale che mi ero fatta e alla quale mi ero tanto affezionata. Ho fatto quello che ho potuto per ridurre quest’effetto fazzoletto ma per eliminarlo completamente avrei dovuto tagliare nuovamente la gonna. Impossibile! Ho mantenuto lo spacco. Ha più senso avere uno spacco che una cucitura pesante e basta. ::::

::::Pattern: Flower Dress 06/2013 #102
by
Burda
Fabric: crepe (100%VI) from
Stoff&Stil
Size: 18 (ref. measurements 177/84/68/94 cm)
Fitting : +++
Mods: changed waistline bodice pleating
::Modello: Vestito 06/2013 #102 di Burda
Tessuto: crepe (100%VI) di Stoff&Stil
Taglia: 18 (mis. di riferimento 177/84/68/94 cm)
Adattamento : +++
Modifiche: pieghe in vita corpetto ::::


::::Another unfortunate thing was that my fabric, a gorgeous crepe viscose I got from Stoff&Stil, is apparently heavier than the fabric this pattern was made for, which is a lightweight silk jacquard I believe. That means the pleat is heavy and pulls down the waistline and the neckline with it… and it didn’t look intentional at all like it were a design feature because it is not cut asymmetrically. It just looked sloppy. I think, on the ‘original’ they masked it (especially the neckline distortion) with the appliqué flowers. But those, I really don’t like … they are definitely not my style. It is more visible on the gown version which doesn’t have the flowers. I often saw on vintage clothing that the dressmakers of old used to insert waist stays made out of petersham (grosgrain) to hold waistlines in place and level. They still use this method on gowns and wedding dresses but I don’t sew many of those. So I tried to make a waist stay. All I could find in the local shops was polyester grosgrain. It was rigid and uncomfortable and with me being definitely not used to wearing one because these are not the 50’s, I felt like I was clad in one of those metal rings that hold wood barrels together. Thrown it away immediately and proceeded to whine about it on Instagram… as you do. Guess what! Everybody suggested a waist stay! I figured I should try again. I managed to find some yellow vintage viscose grosgrain in my mother in law’s stash. It is indeed much softer and malleable but because I had to cut it 4cm (1.5ins) smaller than my waist measurement, that is 6cm (2 inches and change) smaller than the dress waist circumference for it to do its job, it is not a comfortable device to wear… Anyway, If I wear this dress I am probably already in a context I don’t feel that comfortable, to begin with!
::Un’altra piccola sfortuna è stata che il mio tessuto è evidentemente molto più pesante del tessuto originalmente utilizzato: un jacquard leggero di seta. Quindi anche la piega è molto pesante e tira tutto in basso, girovita e scollo. Nel modello originale la deformazione dello scollo viene nascosta dai fiori applique che non mi piacciono tanto. E’ molto più visibile nella versione vestito lungo. Nei vestiti vintage, le sarte di una volta inserivano un cinturino interno fatto di nastro grosgrain (cannetté) per sostenere e tenere a livello le gonne pesanti come quelle degli anni 50. E’ una tecnica che si utilizza ancora, soprattutto per i vestiti da sposa e per i vestiti da alta sartoria. Ma io non cucio molti vestiti da sposa quindi non l’ho mai provata. Nelle mercerie del posto sono riuscita a trovare solo cannetté di poliestere. Il cinturino era rigido e incredibilmente scomodo da indossare. Magari perché non vivendo negli anni 50 non sono neanche abituata a indossare uno. Mi sono lamentata su Instagram del fatto di non riuscire a tenere il girovita a livello e indovinate cosa… tutte mi hanno suggerito di usare un cinturino interno. Mi sono messa alla ricerca e finalmente ho trovato un pezzo di grosgrain di viscosa. E’ giallo ma non conta. Adesso il cinturino è molto più morbido ma visto che ho dovuto tagliarlo 4cm in meno della circonferenza della mia vita (6cm in meno del girovita del vestito ), affinché facesse il suo lavoro, non è per niente comodo da indossare … Va bene lo stesso, se ho questo vestito addosso è molto probabile che io mi trovi già in una situazione di relativo disaggio. ::::

::::Before you ask, there’s no mention of a waist stay in the instructions. Speaking of the instructions, they have you insert a 20cm (8in) invisible side zipper! I can barely slither in and out of this dress and I definitely cannot put it on my dress form.
::Prima che me l’ho chiediate, non c’è menzione del cinturino nelle istruzioni e sinceramente non so come fanno a tenere su la piega! E a proposito di istruzioni, raccomandano di usare una zip invisibile da 20cm. Ho usato una da 22cm in tutta la sua lunghezza e a malapena riesco a infilarmi il vestito. Di metterlo sul manichino non se ne parla nemmeno.::::
::::I do love the dress though. I think it’s a very pretty cocktail dress. It’s just that I hate it so much right now. To sum my feelings about this dress, I went from carefully pressing every seam on a dowel so no marks would show on the right side, to sewing a crude slapped on machine invisible stitch hem instead of my usual beautiful hand stitched hem, just to be done with it.
::Amo questo vestito però … è oggettivamente molto carino e adoro il tessuto. Solo che in questo momento lo sto veramente odiando. Per riassumere quello che sento adesso nei suoi confronti: sono passata dal spianare tutte le cuciture su una superficie cilindrica in modo da non lasciare l’impronta dei margini di cucitura sul davanti del tessuto, al fare un orlo invisibile a macchina da due soldi solo perché non ce la facevo più di vederlo! ::::


::::Now I need to choose my September Burda project and I have no idea what to sew! I only know I want to use the black viscose crepe georgette I also got from Stoff&Still and love so much. What would you make with it? Is there a BurdaStyle pattern you would recommend?::
Adesso devo scegliere il modello Burda da cucire nel mese di settembre come influencer BurdaStyle. No ho idea di cosa voglio cucire, so solo che vorrei usare la crepe georgette nera di viscosa che ho preso sempre da Stoff&Stil, perché è troppo bella. Avete qualche idea? Qualche modello da consigliare? ::::
::::Thank you for visiting. I would love to hear your opinion and if you like it put a <3 on it!:: Grazie della visita. Mi piacerebbe moltissimo sentire la tua opinione e se questo post ti piace mettici un <3!::::